
Get Started With Wasm with go 1.14.2 in 2020
Apologies for the very wordy title, but when I decided I wanted to play around with web assembly last week I found that all of the articles I came across were out of date, so thought it best to be explicit.
In this post I’ll explain what Web Assembly is, how it works in go, and build a small simplified calculator application to hopefully give you the tools you need to delve further into web assembly using go if you wish.
What Is Web Assembly?
Web Assembly (often abbreviated to WASM) is a low level assembly-like language which modern browsers can understand. It is lightning fast (experiments show 20x faster than javascript) and the goal of it is to run alongside Javascript in the browser.
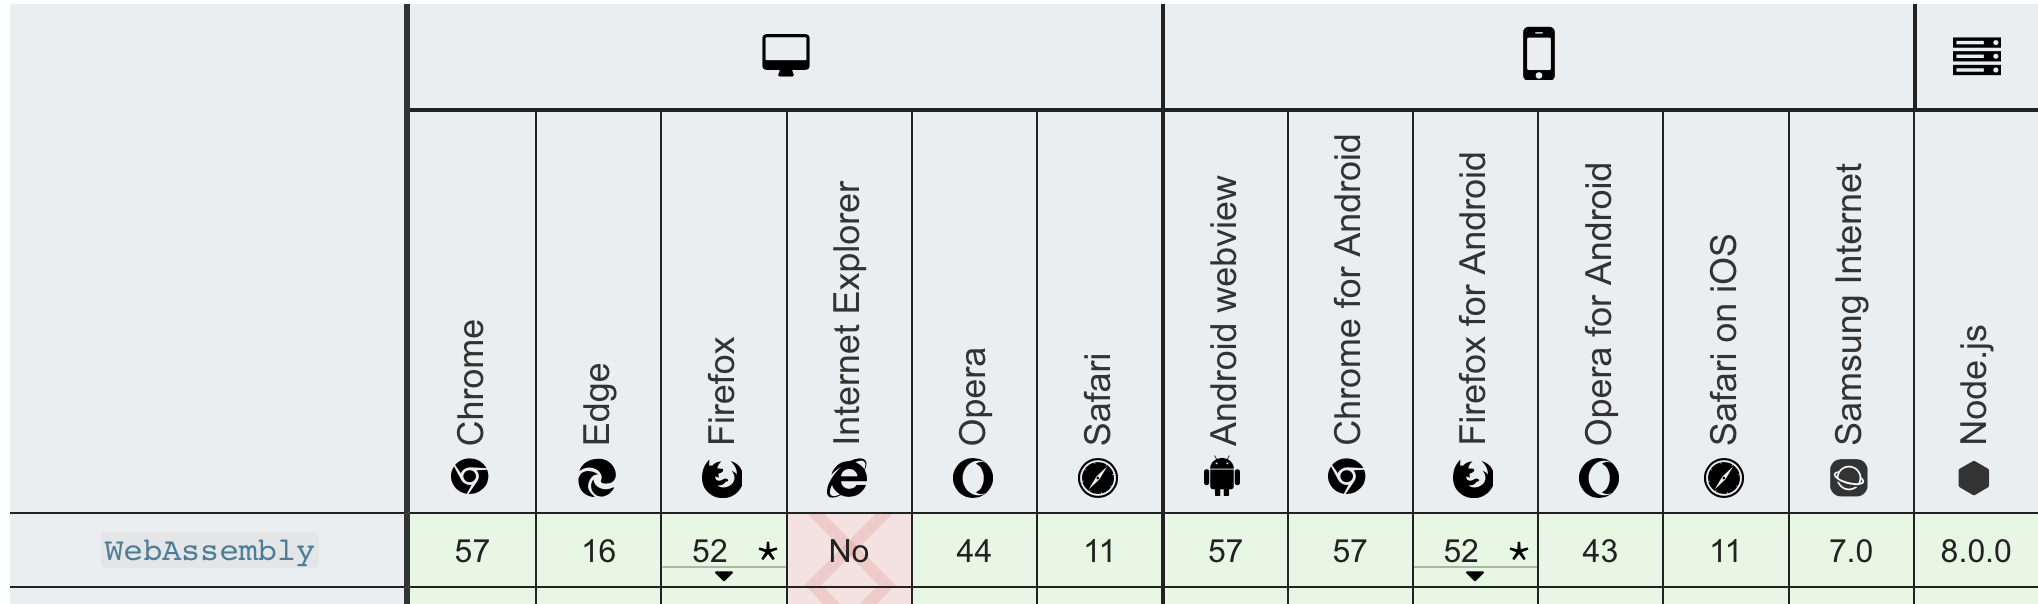
As you can see, it’s well supported by most browsers.
How Does it Work?
WASM code is actually run on a small virtual machine that your browser runs. Remember the days you used to download an ubuntu image and start it in a virtual box on your windows machine? In theory, it’s the same idea. Google Chrome for example, is running what they call the v8 engine which is capable of understanding both web assembly and javascript.
No-one is expected to actually write Web Assembly (although I’m sure someone will), and instead the language will become a compilation target for higher level languages. Most of the focus so far has been on C++ and Rust, but since Go 1.12, we can compile Go for Web Assembly too.
Why Should I Care?
In honesty for most use cases, you don’t need to care and developing JS for the browser like you always have will suffice. But if like me you are interested in exploring the cutting edge of what is possible in Go and understanding the benefits as well as the constraints, it’s well worth spending an afternoon playing with.
WebAssembly.org maintain a list of use cases (most of them are quite advanced) for why you may want to use WASM.
Getting Started
By the end of the tutorial below you will have this really crappy calculator built and ready for deployment.
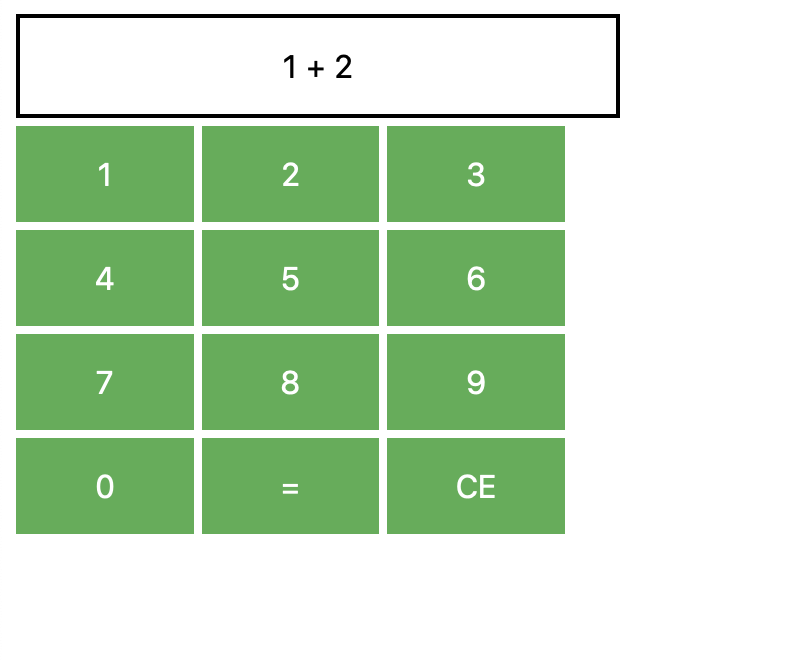 .
It might not look like much but it will prove we know how to:
.
It might not look like much but it will prove we know how to:
- Write some go that compiles to WASM.
- Load that wasm code into our page.
- Modify the resulting HTML/CSS as we always would.
This should give you a strong foundation to go on to build much better things!
I assume you are running go 1.14.x I am running 1.14.2 which is currently the latest available from here. This is genuinely all you need to get going, so lets get to it.
From the terminal run
mkdir gowasmcalc && cd gowasmcalc
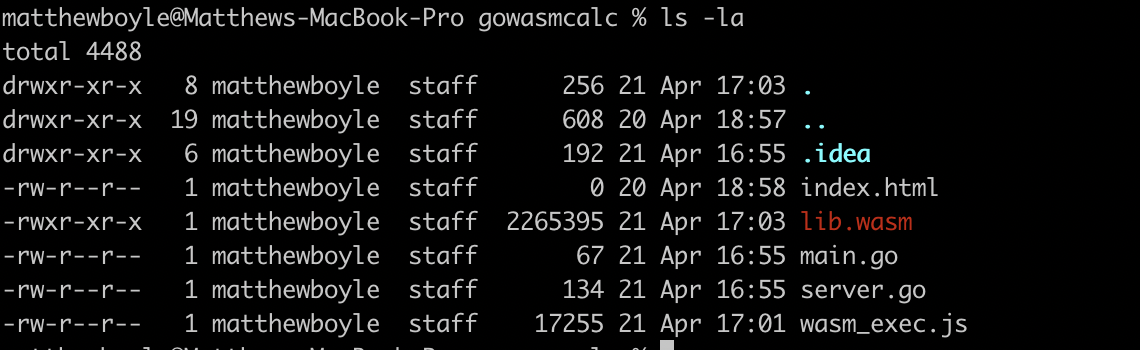
Lets make some basic files we are going to need to get this running. If you type ls you should have something like below:
matthewboyle@Matthews-MacBook-Pro gowasmcalc % ls
index.html main.go    server.go
In index.html, paste in the following:
   <html>
    <head>
<meta charset="utf-8"/>
    </head>

    <body>
    <script src="wasm_exec.js"></script>
    <script>
       if (!WebAssembly.instantiateStreaming) {
    // polyfill
    WebAssembly.instantiateStreaming = async (resp, importObject) => {
const source = await (await resp).arrayBuffer();
return await WebAssembly.instantiate(source, importObject);
    };
}

const go = new Go();

let mod, inst;

WebAssembly.instantiateStreaming(fetch("lib.wasm"), go.importObject).then(
    async result => {

mod = result.module;
inst = result.instance;
await go.run(inst)
    }
    );
</script>
  </body>
</html>
Hopefully the code here is quite self explanatory, and it can serve as boilerplate for any wasm project you want to work on in the future. Effectively it gets our page ready to understand wasm.
There are 2 really important things to call out about the above code.
This line: <script src="wasm_exec.js"></script>
and
This line: WebAssembly.instantiateStreaming(fetch("lib.wasm"),
wasm_exec.js is something the Go team provides to us and we need to include in any wasm project we work on. lib.wasm is the code we are going to build.
To get familiar with the build process, let’s build the simplest Go program we can and compile it to WASM.
in main.go, add the following:
package main

import "fmt"

func main(){
    fmt.Println("hey wasm")
}
and in server.go:
package main

import (
    "log"
    "net/http"
)

func main() {
    log.Fatal(http.ListenAndServe(":8080", http.FileServer(http.Dir("."))))
}
Again, nothing new here. main.go is simply logging to the console (in this instance it will be the browser console) and server.go will simply host our current directory on a web server available at localhost:8080
We now need wasm_exec.js lets move that into our project:
run the following:
cp "$(go env GOROOT)/misc/wasm/wasm_exec.js" .
For those not familiar with unix, this command basically copies wasm_exec.js from GOROOT (where go is installed on your machine) to the current folder. You’ll need this file often so make sure to copy it, not move it. It may even be worth aliasing it.
We now have everything we need to build our project! Run the following command:
GOOS=js GOARCH=wasm go build -o lib.wasm main.go
This tells the go build too that we are building for the javascript OS and the target architecture is the wasm virtual machine. -o lib.wasm means we would like our output file to be called lib.wasm (its what we called it in our html file) and main.go is the go code we want to build.
Running this command should result in no errors, and you should now see a new file called lib.wasm in your folder.
Great! We now have everything we need to run our first WASM program!
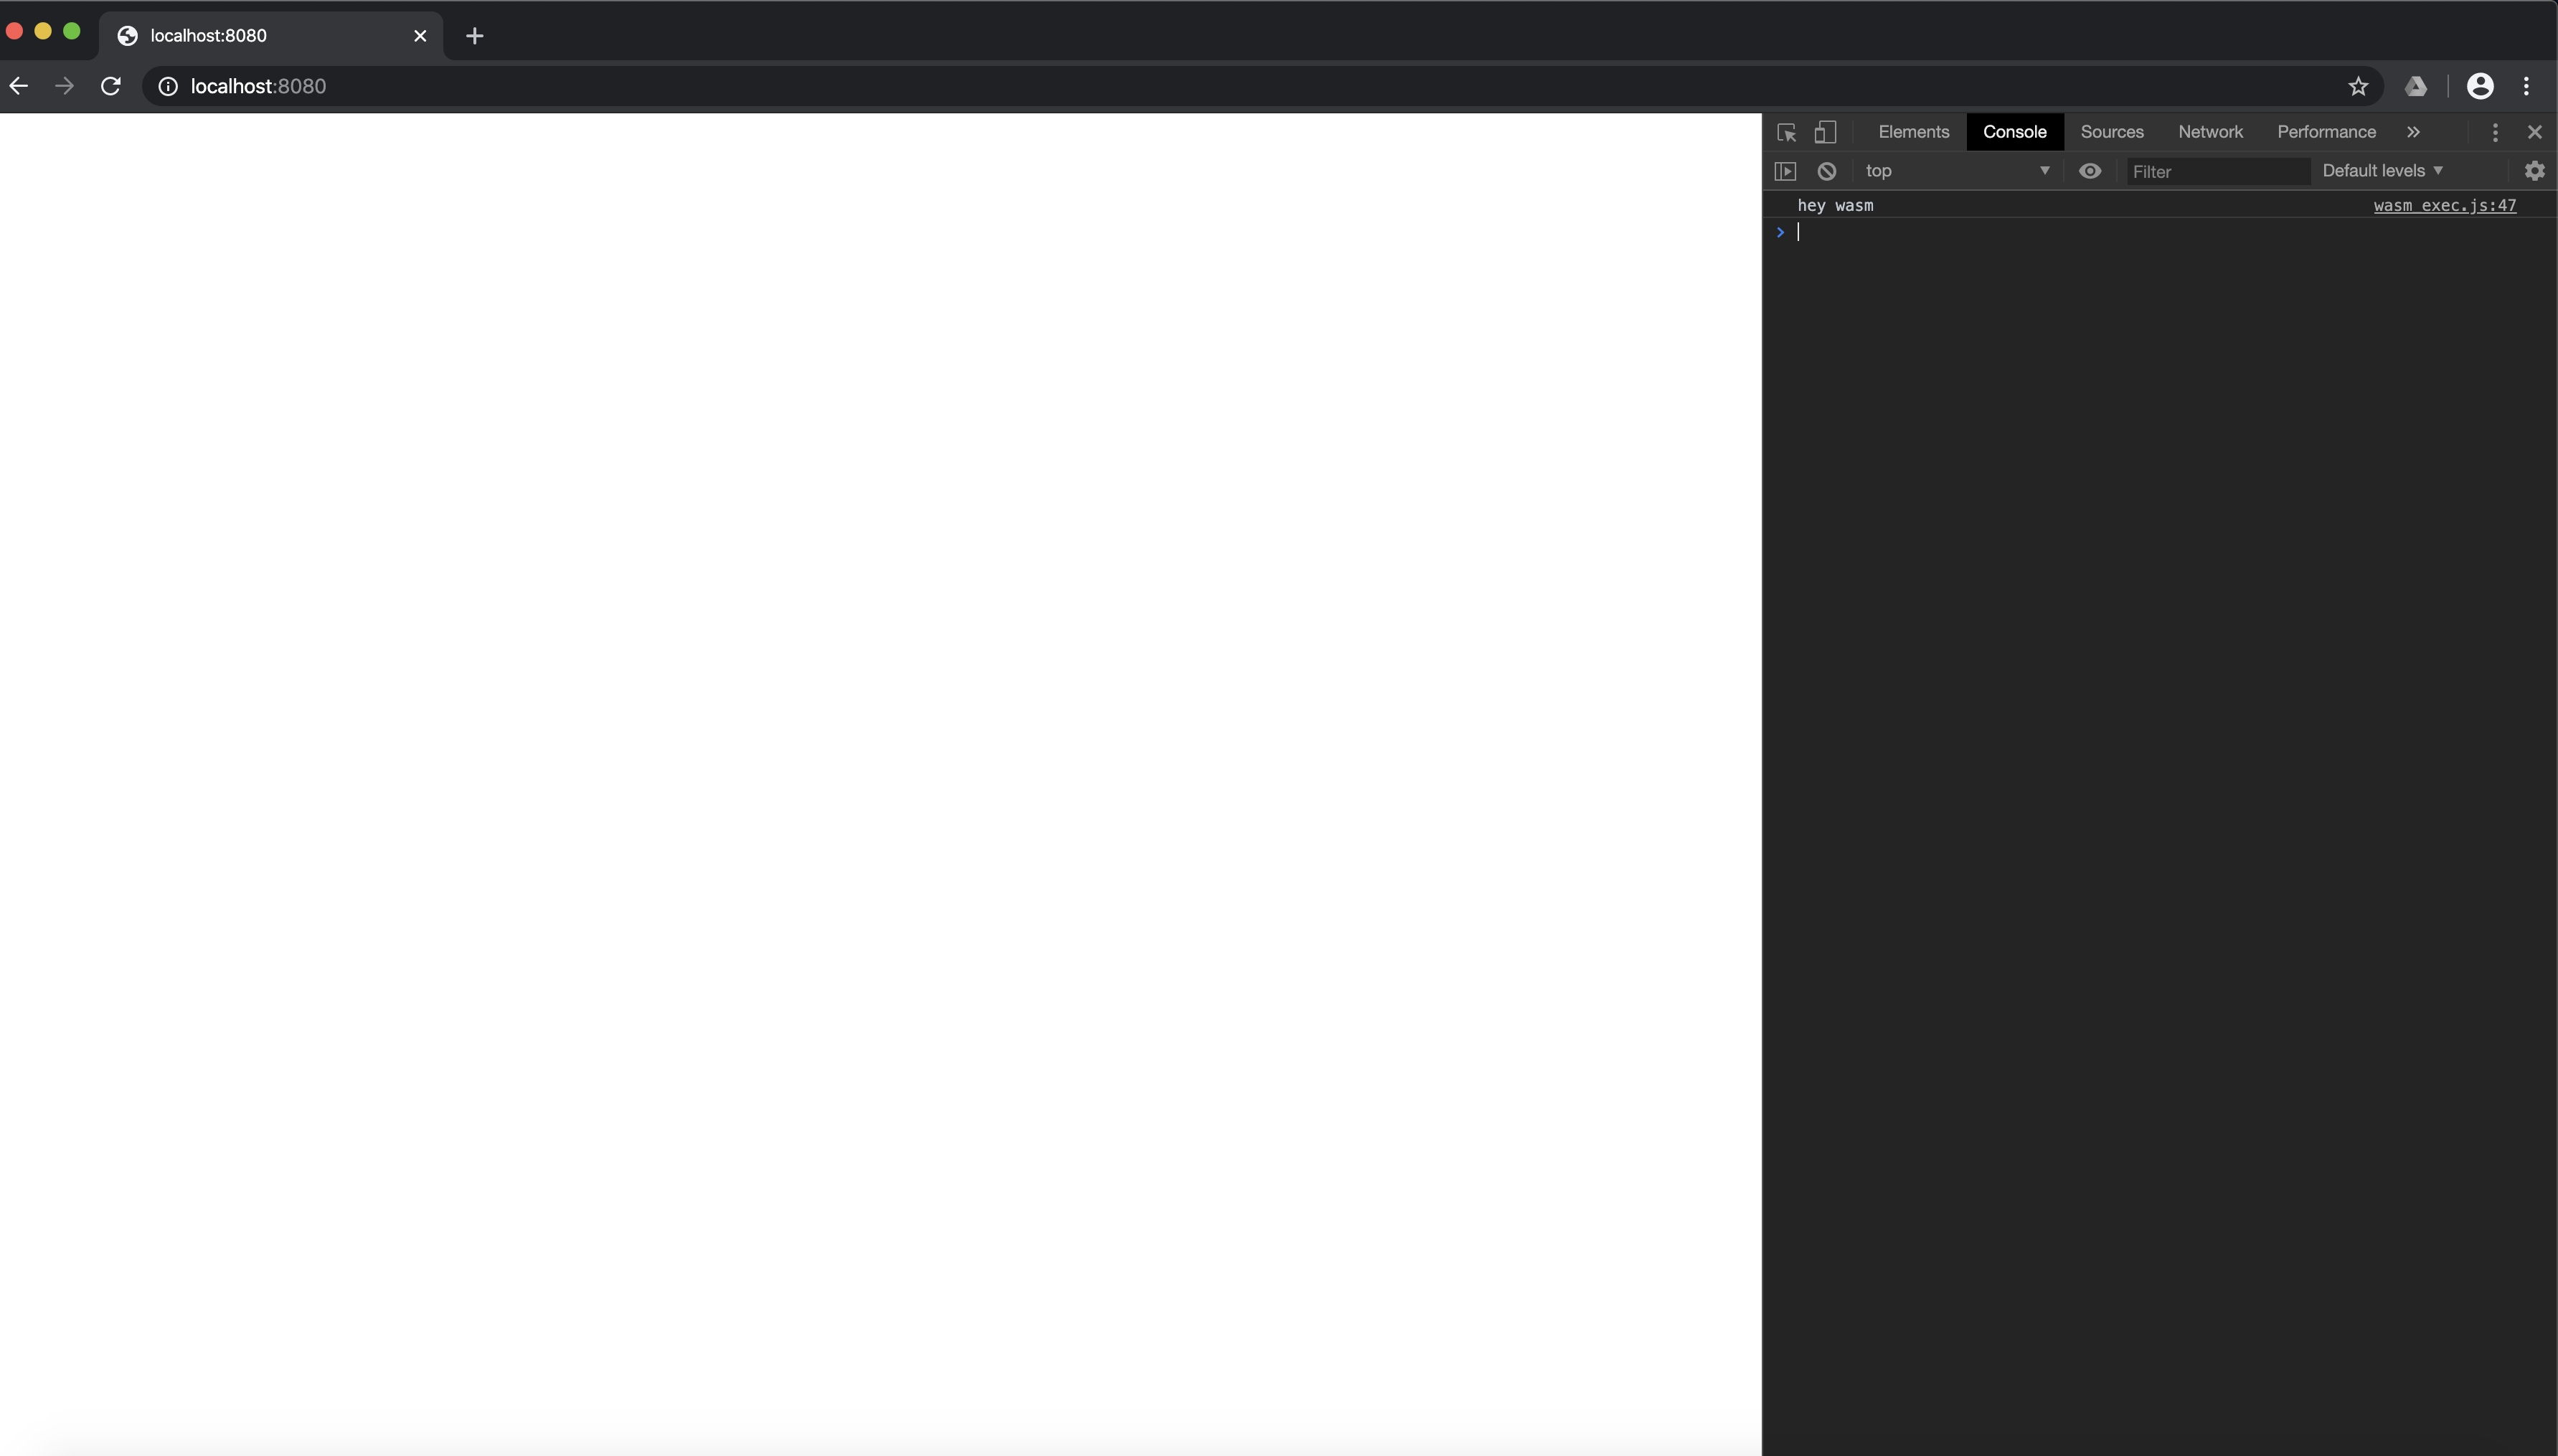
Head back to your terminal and type:
go run server.go
head over to localhost:8080 and open the console (cmd + shift + J on chrome for mac) and you should see the “hey wasm” in the console.
Whilst it might not seem much, you just compiled go to wasm and successfully ran it in the browser, congratulations!
Let’s take this one step further and look at how we can manipulate the DOM and work towards some more advanced use cases. To do this we are going to use a package from the go standard library called syscall/js.
It’s worth noting the package description:
Package js gives access to the WebAssembly host environment when using the js/wasm architecture. Its API is based on JavaScript semantics.
This package is EXPERIMENTAL. Its current scope is only to allow tests to run, but not yet to provide a comprehensive API for users. It is exempt from the Go compatibility promise.
If you look at WASM documentation, or tools that support it, you will rarely see Go mentioned; its usually C++ and Rust. You can therefore expect that as the go version increments your code will break. Therefore ensure you keep track of which version of Go you compiled your code with.
syscall/js will help us manipulate the DOM.
To enable the creation of our calculator, let’s add some basic styling to index.html
  <html>
    <head>
<meta charset="utf-8"/>
<title>Go wasm</title>

<style>
    button {
        background-color: #4CAF50; /* Green */
        border: none;
        color: white;
        padding: 15px 32px;
        width: 5%;
        text-align: center;
        text-decoration: none;
        display: inline-block;
        font-size: 16px;
    }

    #calcScreen{
        border: 2px solid black;
        color: black;
        padding: 15px 32px;
        text-align: center;
        text-decoration: none;
        display: inline-block;
        font-size: 16px;
        width: 17%;
    }
</style>

    </head>

    <body>
    <script src="wasm_exec.js"></script>
    <script>
if (!WebAssembly.instantiateStreaming) {
    // polyfill
    WebAssembly.instantiateStreaming = async (resp, importObject) => {
        const source = await (await resp).arrayBuffer();
        return await WebAssembly.instantiate(source, importObject);
    };
}

const go = new Go();

let mod, inst;

WebAssembly.instantiateStreaming(fetch("lib.wasm"), go.importObject).then(
    async result => {

        mod = result.module;
        inst = result.instance;
        await go.run(inst)
    }
);
    </script>

    <input type="text" id="calcScreen"/>
    <br/>
    <button onClick="calcPush(1);"> 1</button>
    <button onClick="calcPush(2);"> 2</button>
    <button onClick="calcPush(3);"> 3</button>
    <br/>
    <button onClick="calcPush(4);"> 4</button>
    <button onClick="calcPush(5);"> 5</button>
    <button onClick="calcPush(6);"> 6</button>
    <br/>
    <button onClick="calcPush(7);"> 7</button>
    <button onClick="calcPush(8);"> 8</button>
    <button onClick="calcPush(9);"> 9</button>
    <br/>
    <button onClick="calcPush(0);"> 0</button>
    <button onClick="getRes();"> =</button>
    <button onClick="clearAdds();"> CE</button>


    </body>
    </html>
A few things to note about the above:
- I suck at CSS, but as you can see you can style things how you normally would. you don’t need to anything special here.
- I have declared some buttons that have functions connected with them such as
calcPush. These are actually functions we are going to write in go. We’ll come back to that in a second. For now, you should be able to refresh your browser window and see the most beautiful calculator UI. 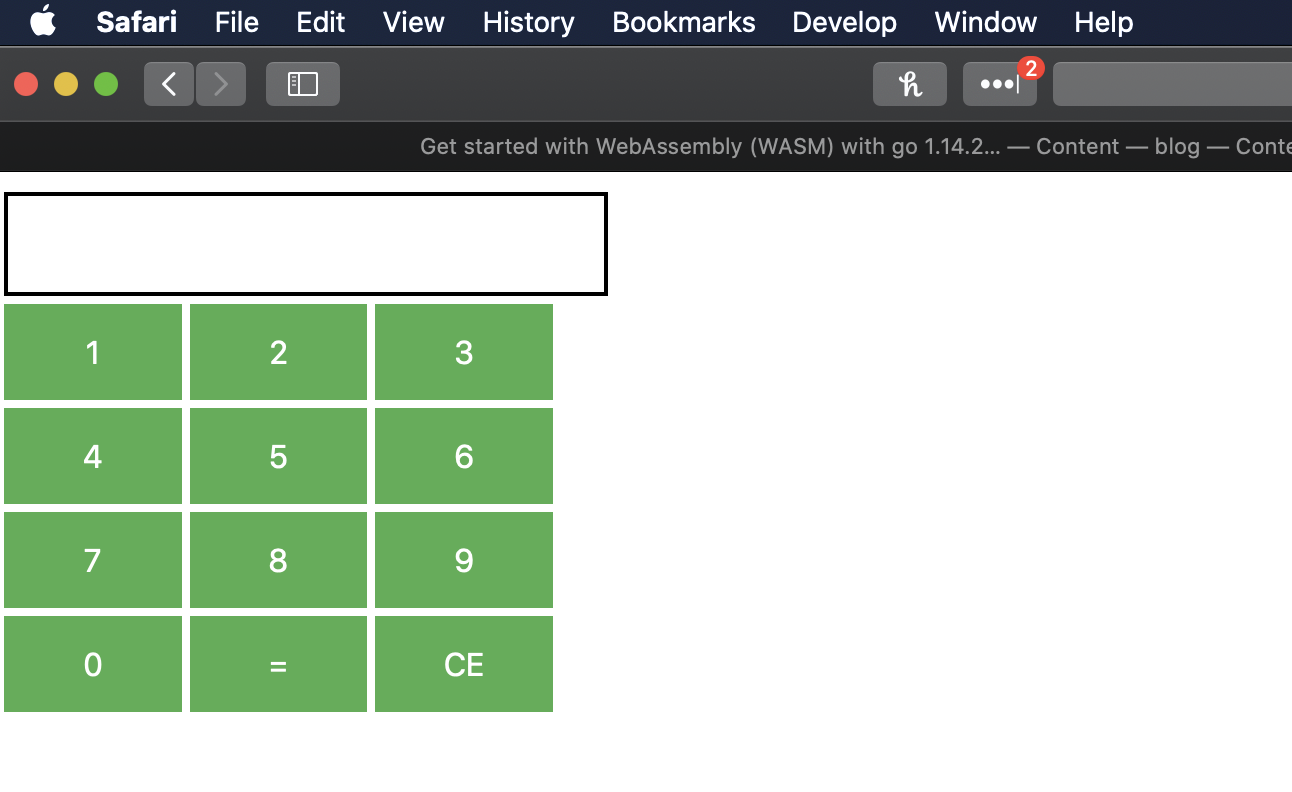

Cool, let’s go back to Go.
Firstly, let’s add "syscall/js" as an import.
Next we want to “connect” the javascript into our golang. We already identified some functions in javascript we want to call on button click. One of which is calcPush
Add the following to main()
js.Global().Set("calcPush", js.FuncOf(calcPush))
Lets talk through what we have wrote here. Global() returns the javascript window object. This enables us to place things on it to be able to use them later, which is exactly what set() does.
FuncOf is a little more interesting. Let’s take a look at the function signature.
func FuncOf(fn func(this Value, args []Value) interface{}) Func
We can assert from this that we need to pass a function that satisfies func(this Value, args []Value) interface{}. We aren’t currently doing this, as calcPush doesn’t exist. We can fix that shortly. In this context, this is referring to the javascript this and args is a []Value where Value is a JavaScript value. The zero value is the JavaScript value “undefined”.
This API is a little confusing and difficult to understand, but hopefully will clear up when I show an example. Let’s implement calcPush
Firstly, I’m going to declare a global []int
var eval []int
This will be used to push numbers we wish to do addition on to.
Now let’s declare calcPush
   func calcPush(this js.Value, args []js.Value) interface{} {
        eval = append(eval, js.ValueOf(args[0]).Int())

        js.Global().Get("document").Call("getElementById", "calcScreen").Set("value", buildString(eval))
        return nil
    }
In the above function, we grab the parameter passed to calcPush. We know that calcpush should only have 1 parameter always, since in our index.js we are always just passing the number value. It would be wise to check the length of the array here before doing anything further if this was something we were trying to make production ready. We then call js.ValueOf() The documentation for this is very helpful:
   // ValueOf returns x as a JavaScript value:
    //
    //  | Go                     | JavaScript             |
    //  | ---------------------- | ---------------------- |
    //  | js.Value               | [its value]            |
    //  | js.Func                | function               |
    //  | nil                    | null                   |
    //  | bool                   | boolean                |
    //  | integers and floats    | number                 |
    //  | string                 | string                 |
    //  | []interface{}          | new array              |
    //  | map[string]interface{} | new object             |
    //
    // Panics if x is not one of the expected types.
Its particularly worth being aware of the panic here; this is a very brittle function that shows how in its infancy the WASM code for go is.
Since we know this will return a float for us, we can call .Int() on it. Again, this could panic if we didn’t have a number type.
The next line looks almost exactly like Javascript:
js.Global().Get("document").Call("getElementById","calcScreen").Set("value", buildString(eval))
buildString is a quick go function I wrote to chain numbers to be added together to appear in the calculators UI bar. The code for that is here:
   func buildString(eval []int) string {
        res := ""
        for i := 0; i < len(eval)-1; i++ {
            s := strconv.Itoa(eval[i])
            res = res + s + " + "
        }

        t := strconv.Itoa(eval[len(eval)-1])
        res = res + t

        return res
    }
We basically have everything we need! I implemented a couple of other functions that don’t introduce any new concepts but add more calculator function. You can see them below.
My final main.go:
package main


    import (
        "fmt"
        "strconv"
        "syscall/js"
    )

    var eval []int

    func main() {
        c := make(chan struct{}, 0)

        fmt.Println("WASM INIT")
        js.Global().Set("calcPush", js.FuncOf(calcPush))
        js.Global().Set("getRes", js.FuncOf(evaluate))
        js.Global().Set("clearAdds", js.FuncOf(purge))

        <-c
    }

    func purge(this js.Value, args []js.Value) interface{} {
        eval = make([]int, 0)
        js.Global().Get("document").Call("getElementById", "calcScreen").Set("value", "")
        return nil
    }

    func evaluate(this js.Value, args []js.Value) interface{} {
        res := 0
        for _, v := range eval {
            res += v
        }

        js.Global().Get("document").Call("getElementById", "calcScreen").Set("value", strconv.Itoa(res))
        eval = make([]int, 0)
        return nil
    }

    func calcPush(this js.Value, args []js.Value) interface{} {
        eval = append(eval, js.ValueOf(args[0]).Int())

        js.Global().Get("document").Call("getElementById", "calcScreen").Set("value", buildString(eval))
        return nil
    }

    func buildString(eval []int) string {
        res := ""
        for i := 0; i < len(eval)-1; i++ {
            s := strconv.Itoa(eval[i])
            res = res + s + " + "
        }

        t := strconv.Itoa(eval[len(eval)-1])
        res = res + t

        return res
    }
My final index.html
     <html>
    <head>
<meta charset="utf-8"/>
<title>Go wasm</title>

<style>
    button {
        background-color: #4CAF50; /* Green */
        border: none;
        color: white;
        padding: 15px 32px;
        width: 5%;
        text-align: center;
        text-decoration: none;
        display: inline-block;
        font-size: 16px;
    }

    #calcScreen{
        border: 2px solid black;
        color: black;
        padding: 15px 32px;
        text-align: center;
        text-decoration: none;
        display: inline-block;
        font-size: 16px;
        width: 17%;
    }
</style>

    </head>

    <body>
    <script src="wasm_exec.js"></script>
    <script>
if (!WebAssembly.instantiateStreaming) {
    // polyfill
    WebAssembly.instantiateStreaming = async (resp, importObject) => {
        const source = await (await resp).arrayBuffer();
        return await WebAssembly.instantiate(source, importObject);
    };
}

const go = new Go();

let mod, inst;

WebAssembly.instantiateStreaming(fetch("lib.wasm"), go.importObject).then(
    async result => {

        mod = result.module;
        inst = result.instance;
        await go.run(inst)
    }
);
    </script>

    <input type="text" id="calcScreen"/>
    <br/>
    <button onClick="calcPush(1);"> 1</button>
    <button onClick="calcPush(2);"> 2</button>
    <button onClick="calcPush(3);"> 3</button>
    <br/>
    <button onClick="calcPush(4);"> 4</button>
    <button onClick="calcPush(5);"> 5</button>
    <button onClick="calcPush(6);"> 6</button>
    <br/>
    <button onClick="calcPush(7);"> 7</button>
    <button onClick="calcPush(8);"> 8</button>
    <button onClick="calcPush(9);"> 9</button>
    <br/>
    <button onClick="calcPush(0);"> 0</button>
    <button onClick="getRes();"> =</button>
    <button onClick="clearAdds();"> CE</button>


    </body>
    </html>
Compile and Run! You should be able to add a bunch of numbers together in your browser.
Project Extensions
If you’d like to test yourself further and improve your Go further, have a go at:
- Adding Tests for everything we wrote so far.
- Adding the ability to use other operators (*,/,%). Don’t forget BIDMAS
- Add the ability to do the above on large numbers, decimals and negative numbers.
- Clean up the code! There is lots of opportunities for reuse and to increase safety.
